THE PROCESS
If you're curious about how a custom project comes together, the best way to show you is to take you behind the scenes of a real build.
Meet Brenna. She purchased a charming 1940s home and wanted to add a dining room buffet before move-in day. She needed significant storage space and wanted a stunning focal point for the room. The piece needed to honor the historic character of the house, deliver modern, practical functionality, and work around the room's real-world constraints, including accommodating an existing floor vent, relocating electrical outlets, and adjusting the buffet depth so it didn't crowd the room. All while staying within a $5,000-7,500 budget.
Here is how we took her vision from a rough sketch to a permanent and beautiful part of her home.
Concept and Consult


First, we met on-site to take exact measurements, map out a rough budget, and weigh options like adding drawers or choosing a tile vs. hardwood top. From there, we used a shared Pinterest board to align on the exact aesthetic Brenna was drawn to. I gave her a list of design decisions to make–including countertop materials, finishes, hardware, door styles, and colors–and provided insights on how each choice would impact both everyday wear-and-tear and final costs.

With all the design decisions made, I created a detailed dimensioned drawing so Brenna could see exactly how the buffet would look. We reviewed everything together and tweaked and confirmed the details. Once she signed off on the final design, I gave her a final quote for the project, she paid a 50% deposit, I secured the materials, and we were officially ready to build.
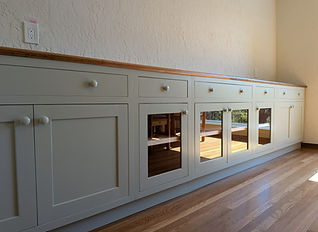
Brenna had a clear idea for what she wanted: a massive buffet that spanned the entire14-foot wall of her dining room, featuring a mix of solid and glass-front doors. And then there were those special considerations, like moving outlets, a specific depth for the buffet, and working around the floor vent. She even provided her own rough sketches to get us started (though don't feel like you have to do this! Most clients don't.)
3
1
2
Budget and Pricing
Pricing combines raw materials and the shop labor required for a build. Because every piece is custom, we have flexibility to adjust details to balance style, complexity, and cost before a single board is cut.
Real Materials: Unlike big-box furniture often made from particleboard or plastic laminates, I build with solid wood and high quality sheet goods. Sourcing ranges from classic domestic hardwoods (like Oak, Walnut, Maple, and Cherry) to premium exotic woods (like Teak, Zebrawood, Mahogany, and Wenge).
Artistry and Technique: Cost is driven by complexity. A minimalist piece with simple lines takes less time than a build requiring complex joinery, integrated lighting, or a bank of custom drawers.
I always break down quotes transparently so you can see exactly what drives costs, giving us the freedom to tweak materials and features.

Brenna's project had five big cabinet boxes, a wood countertop of 14 feet, dovetail drawer boxes, and premium soft-close hardware on everything. Materials cost roughly $2000, and labor with installation totaled $5000, totaling $7000 for this build.


This project took three weeks to complete. After Brenna’s 50% down payment, I ordered the materials and began work on the cabinet boxes. Throughout the build, I sent regular photo updates so she could watch the piece come to life.
One of the best parts of custom woodworking is the flexibility to refine details during the process. For example, when it came time for the drawer pulls, we tested a few different options before ultimately choosing wooden pulls painted to match the doors. This continuous, open communication kept the project moving quickly and ensured there were no surprises in the final result.
Building Time
Installation
Once the buffet was nearly finished, we scheduled a convenient installation day. I brought everything on-site to complete the install in a single day, including rewiring the outlets to ensure easy power access right above the countertop.
After installation, we reviewed the entire project together. If there is ever a defect in craftsmanship or a design detail that isn't quite right, I fix it. On this project, I actually forgot to bring the extra trim piece planned for the partially covered wall vent—so I came back later to install that final piece.
Brenna was thrilled with how the buffet turned out. She even created a custom quilt to hang right above the buffet, designing it from a sketch she made of an old photograph taken by the home's previous owner. It was the perfect full-circle moment for the 1940s home. Together, the two pieces have anchored the dining room—making it a beautiful, functional space for family meals and welcoming friends.


Final Results